Rhino, shopbot and making fabduino ready.
Rhino
We learned operation of Shopbot today and Luciano gave an introduction to the rhino 3d software. Rhino is one of the most popular 3D design softwares. It is easy to use and beginner friendly. From today's introduction I identified that it support Boolean operations on solids, workability around a Cartesian system, shells of 0 thickness, modeling interface where you have 4 views(top, bottom side and perspective) side by side which was new to me and commandline feature like in autocad etc.
I'm used to solidworks but it is easy to switch from solidworks to rhino. Most useful feature in solidworks is the parametric modeling. That means if I change the radius of the circle I used to create a cylinder with the radius of the cylinder also changes. Rhino doesn't have a history based solid creation model. That means if you use a reference from a feature and Let's say it gets deleted, solidworks would throw up an error and in rhino we are free of such a constraint, once you create a solid it is created and it is independent of the drawing or other features you used to create it from. We made a few practice drawings and solidmodels in rhino to get familiar with it. Rhino allows exploding option on a solid too. Let me explain. In autocad or any 2D cad drawing software we have an option to break a single polyline(chain of lines and curves as one entity) into its component parts which then can be manipulated individually. Rhino allows us to break a solid into component surfaces. This is a real cool feature in Rhino that can be played around with immensely. I am yet to explore usefulness of this option.
Shopbot
We changed the setting in shopbot for it to perform better. We changed the units from inches to mm first. Earlier the shopbot experienced high jerk during fast jog moves, this was resolved by setting up proper speed and ramp values.
Design rules for Shopbot
Luciano explained different designing techniques used to create stuff from
cnc routed wood among them are.
Ribbing to get an overall organic look or an illusion of it. This
technique cause lot of wastage. In order to improve it we could nest
different parts inside a hole that is going to be cut or try to nest
several sizes of ribs which will be just offset to the outermost.
Waffle technique .
Pressfit
Wood joinery
Japanese fittings
Bent wood- multiple veneers few mm thick and bendable, glued in a shape one layer at a time.
Burning bootloader into fabduino
We connect the fabisp to the fabduino and fabduino to the computer using FDTI cable and burn the bootloader from arduino after arduino has be setup to burn proper bootloader.
I added a 8MHz external resonator to the circuit now, this is optional but it is recommended to use resonator for better precision in timing. It will be helpful in generating clean PWM for the stepper motor application.
The instruction to burn bootloader to the fabduino is given in following link. Note that some modification were done to suit our purpose hence you can follow the instruction here for the latest stuff.
http://fab.cba.mit.edu/content/projects/fabkit/
FabISP we created last week was used to burn the bootloader into the fabduino.We didn't have the jumper cable connectors necessary to connect the ISP pins from ISP to the header pins of fabduino. Hence I decided to use the 6 pin ribbon cable with end one with 6 pin female connector and the other end open to be used to temporarily connect to the header pins of fabduino by soldering it to the ends of the pins where they get soldered to the bord. I made a made a short ribbon cable with female 6 pin ISP connector, and all of its wires separated and and stripped a little at the other end. Do not strip a great length of the ribbon cable since it might cause shorting due to tangle later when soldering to header pins
The FabISP has VCC, GND, MISO, MOSI and SCK these need to connected to the corresponding pins of the Fabduino. I located the pins using the following diagram
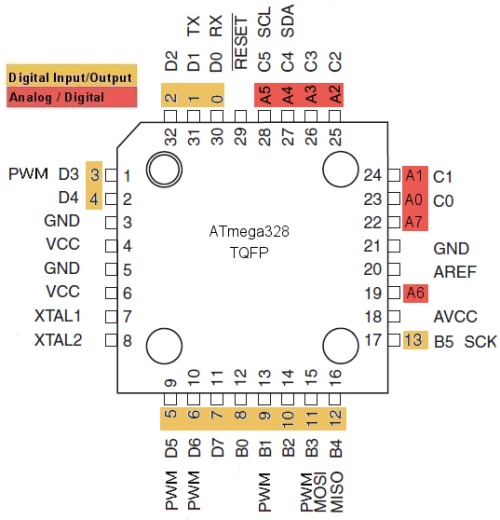
Matching with the header connector pins we get:
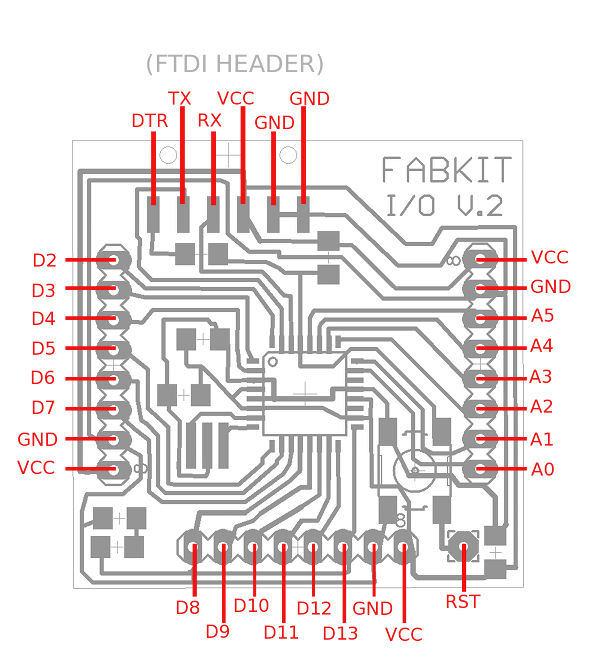
VCC and GND of the bottom header is used to connect to the ISP VCC and GND
The reset pin from the ISP has to be connected to the RST pad of the fabduino.
D13 - SCK
D12 - MOSI
D11 - MISO
For FDTI cable connection the right orientation is also given n the above image.
The corresponding pins in FABISP are shown as J1 ISP located in the bottom right corner of the image.
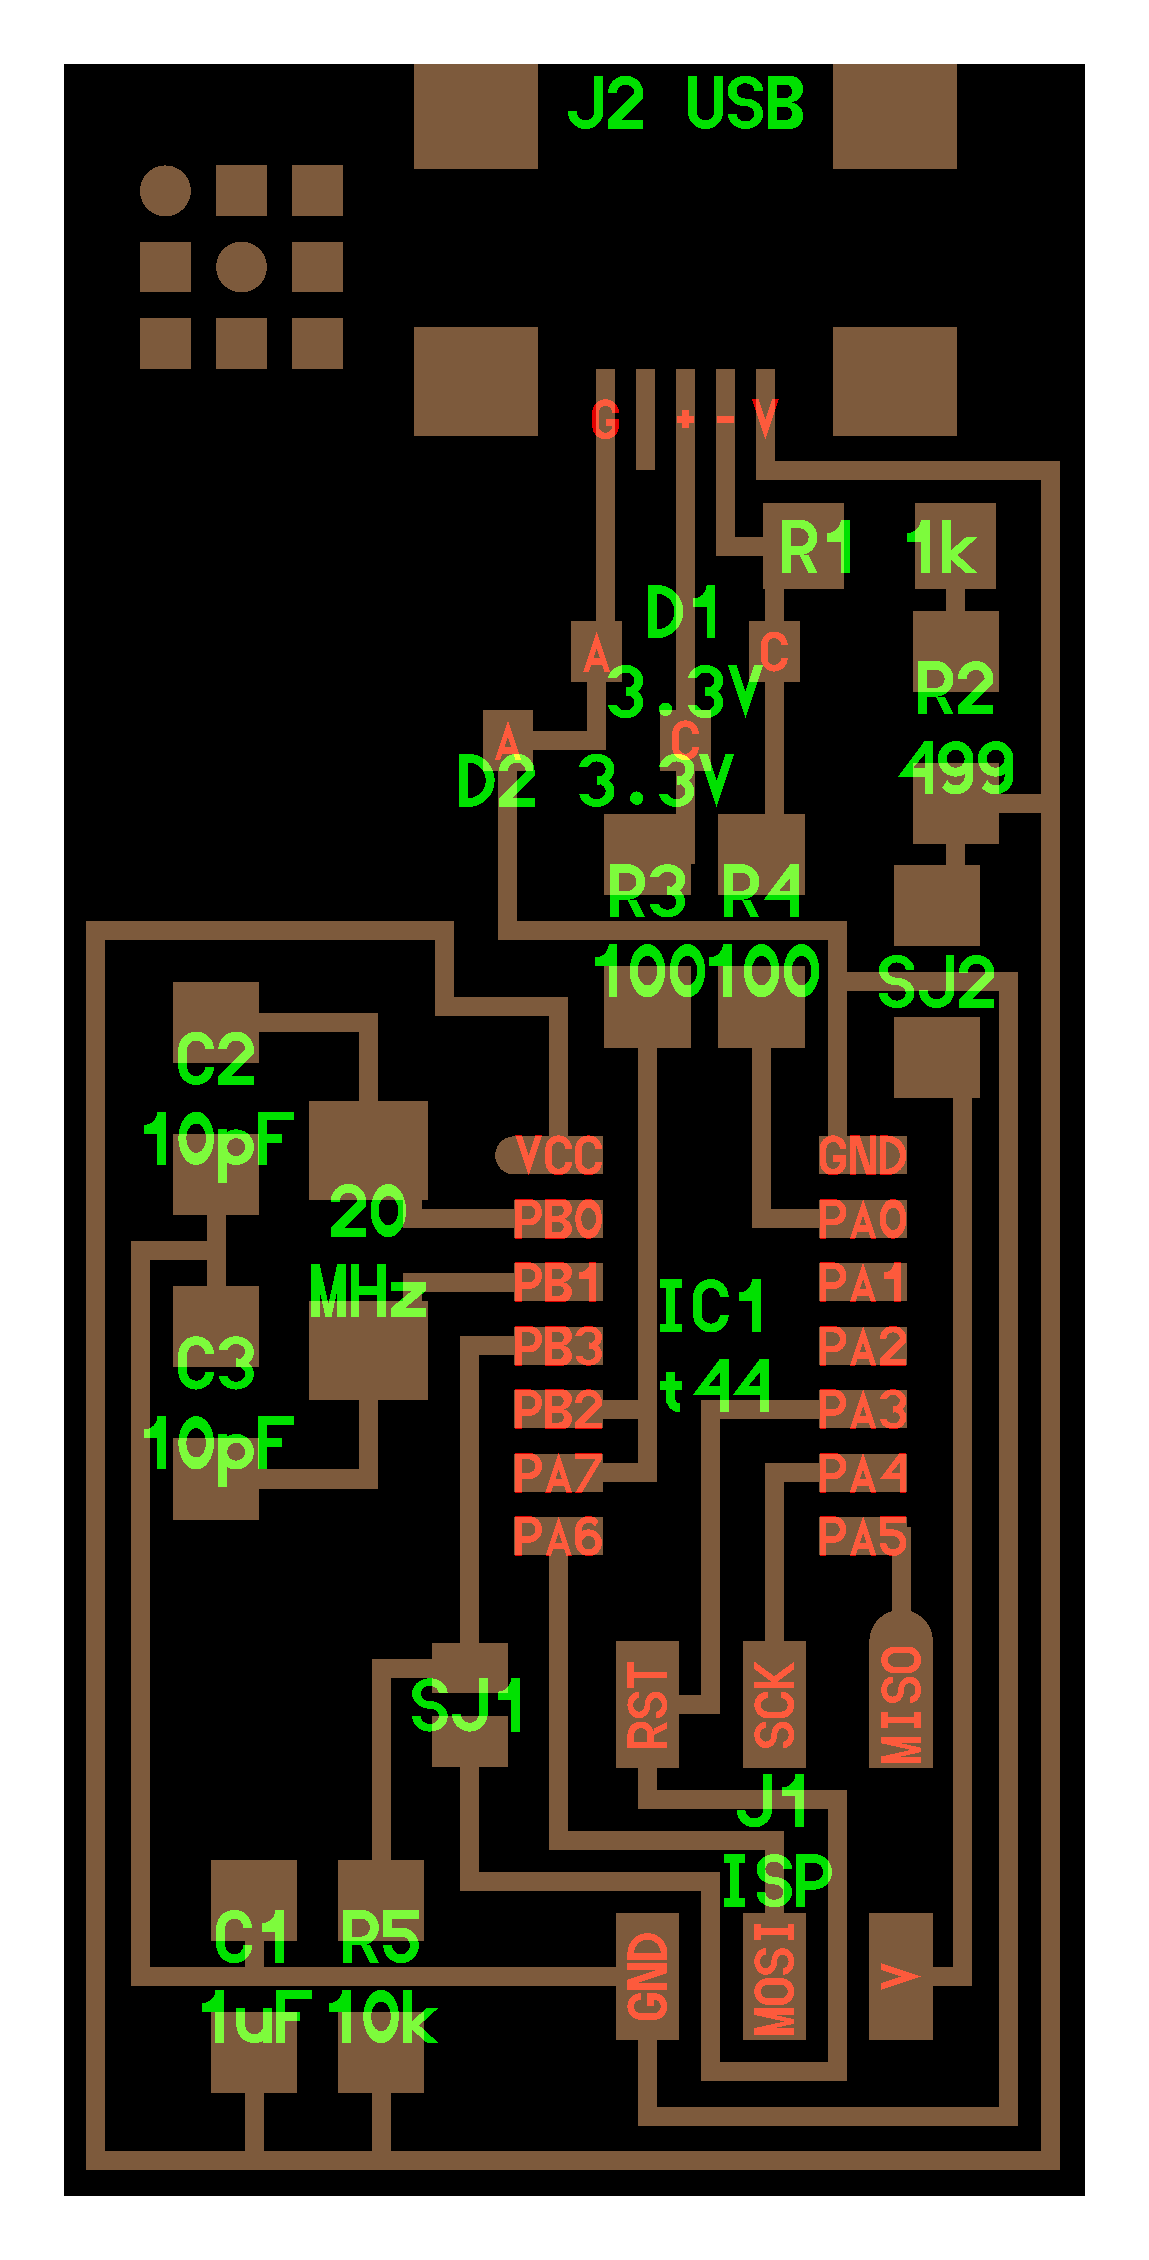
I connected the 6 pin ribbon with the ISP connector on the fabisp and manually using continuity check option provided in the multimeter I matched each pin of the ribbon cable with the corresponding pin of the ISP. I proceeded to solder it to the bottom of header pin which had already been soldered in place, for this I just reheated the solder present in the bottom of the pad which was used to solder the header pins onto the pad and poked the wires end of the wires from ribbon cable into the molten solder. This made a pretty good temporary connection I wanted. The stripped wire strands have to be twisted properly into one strand before being soldered or else they might poke out and short other pins. After soldering all the wires i made sure no shorting is occuring among any pins.
I soldered reset wire to the RST pad, and we are ready to burn the bootloader.
Burning Bootloader from Arduino 1.6.6 IDE
Once the ISP pins are connected and FabISP plugged into your computer through FTDI cable,
go to "Tools->Board" in the Arduino IDE and pick the Arduino pro or pro mini
In the "Tools->Processor" pick Atmega328 (8Mhz external Clock)
In "Tools->Programmer" pick "USBTinyISP"
and then pick "Tools->Burn Bootloader".
Everything went well and the fabduino now was powered up with blink program loaded and the LED blinking with 1 Sec pulse to show that.
Burning bootloader into fabduino
We connect the fabisp to the fabduino and fabduino to the computer using FDTI cable and burn the bootloader from arduino after arduino has be setup to burn proper bootloader.
I added a 8MHz external resonator to the circuit now, this is optional but it is recommended to use resonator for better precision in timing. It will be helpful in generating clean PWM for the stepper motor application.
The instruction to burn bootloader to the fabduino is given in following link. Note that some modification were done to suit our purpose hence you can follow the instruction here for the latest stuff.
http://fab.cba.mit.edu/content/projects/fabkit/
FabISP we created last week was used to burn the bootloader into the fabduino.We didn't have the jumper cable connectors necessary to connect the ISP pins from ISP to the header pins of fabduino. Hence I decided to use the 6 pin ribbon cable with end one with 6 pin female connector and the other end open to be used to temporarily connect to the header pins of fabduino by soldering it to the ends of the pins where they get soldered to the bord. I made a made a short ribbon cable with female 6 pin ISP connector, and all of its wires separated and and stripped a little at the other end. Do not strip a great length of the ribbon cable since it might cause shorting due to tangle later when soldering to header pins
The FabISP has VCC, GND, MISO, MOSI and SCK these need to connected to the corresponding pins of the Fabduino. I located the pins using the following diagram
Matching with the header connector pins we get:
VCC and GND of the bottom header is used to connect to the ISP VCC and GND
The reset pin from the ISP has to be connected to the RST pad of the fabduino.
D13 - SCK
D12 - MOSI
D11 - MISO
For FDTI cable connection the right orientation is also given n the above image.
The corresponding pins in FABISP are shown as J1 ISP located in the bottom right corner of the image.
I connected the 6 pin ribbon with the ISP connector on the fabisp and manually using continuity check option provided in the multimeter I matched each pin of the ribbon cable with the corresponding pin of the ISP. I proceeded to solder it to the bottom of header pin which had already been soldered in place, for this I just reheated the solder present in the bottom of the pad which was used to solder the header pins onto the pad and poked the wires end of the wires from ribbon cable into the molten solder. This made a pretty good temporary connection I wanted. The stripped wire strands have to be twisted properly into one strand before being soldered or else they might poke out and short other pins. After soldering all the wires i made sure no shorting is occuring among any pins.
I soldered reset wire to the RST pad, and we are ready to burn the bootloader.
Burning Bootloader from Arduino 1.6.6 IDE
Once the ISP pins are connected and FabISP plugged into your computer through FTDI cable,
go to "Tools->Board" in the Arduino IDE and pick the Arduino pro or pro mini
In the "Tools->Processor" pick Atmega328 (8Mhz external Clock)
In "Tools->Programmer" pick "USBTinyISP"
and then pick "Tools->Burn Bootloader".
Everything went well and the fabduino now was powered up with blink program loaded and the LED blinking with 1 Sec pulse to show that.